这篇博客将介绍如何使用 Tesseract 的方向和脚本检测 (OSD) 模式执行自动文本方向检测和更正。
orientation and script detection (OSD) 方向和脚本检测
text orientation 文本定向
OSD模式检测并提供了图像中文本的方向,估计的旋转校正角度和脚本/书写系统。文本方向是指图像中文本的角度(以度为单位)。执行 OCR 时可以通过校正文本方向来获得更高的准确性。另一方面,脚本检测是指文本的书写系统,可以是拉丁语,汉字,阿拉伯语,希伯来语等。
任何 OCR 系统的一个基本组件都是图像预处理 ——呈现给OCR引擎的输入图像质量越高,OCR 输出就越好。要在 OCR 中取得成功,最重要的预处理步骤是文本方向。
1. 效果图
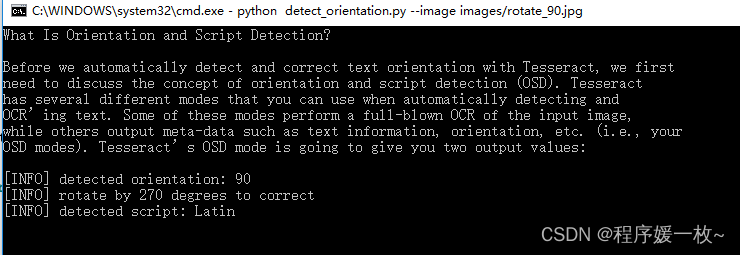
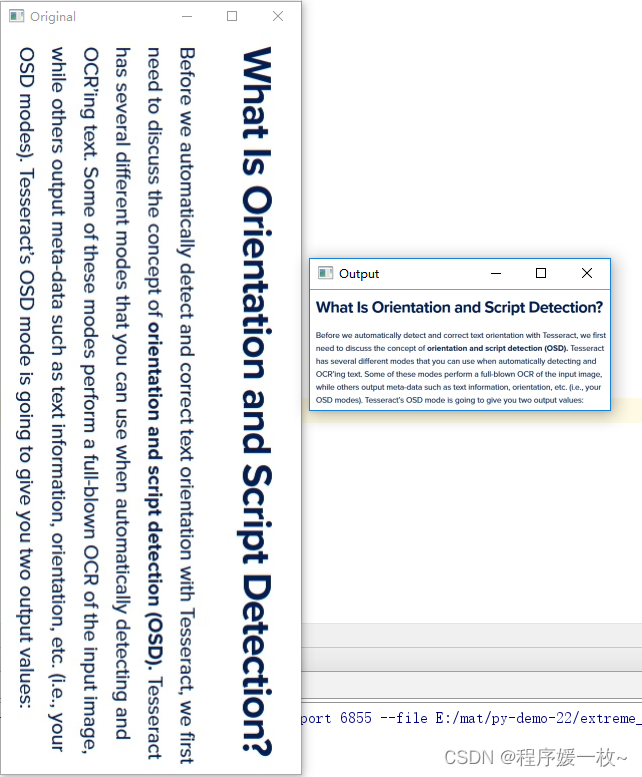
原图 VS 旋转校正后图如下:
可以看到文本正确识别,并且当前文本旋转了90°,需要旋转270°进行校正,文本的语言类型是Latin文。下图也可以看到文本方向被正常校正。
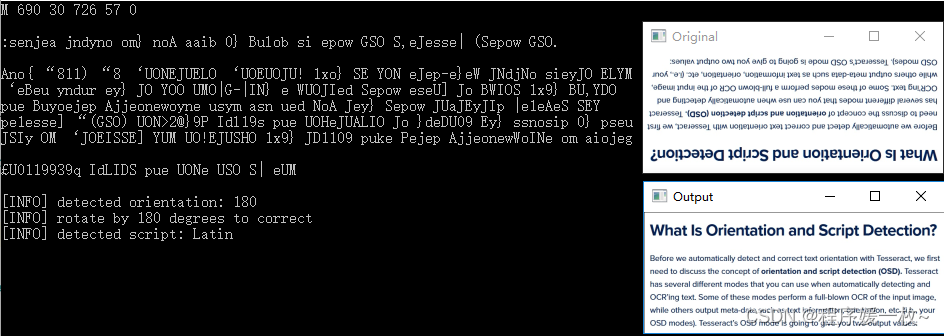
效果图2如下:
可以看到文本正确识别,当前文本旋转了180°,需要旋转180°进行校正,文本的语言类型是Latin文。下图也可以看到文本方向被正常校正。
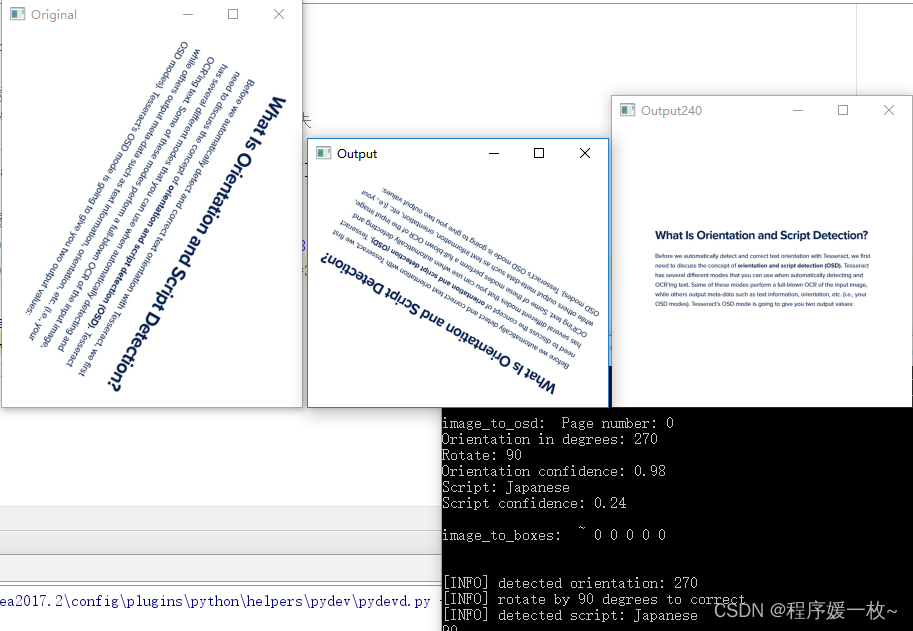
效果图3如下:对于旋转非90°或者90°倍数的识别有问题,如下图所示;
2. 原理
文本方向是指图像中一段文本的旋转角度。如果文本明显旋转,则给定的单词、句子或段落在 OCR 引擎中看起来就像胡言乱语。OCR引擎是智能的,但像人类一样,它们没有被训练成倒置阅读!
因此为 OCR 准备图像数据的关键第一步是检测文本方向(如果有),然后更正文本方向。 将校正后的图像呈现到 OCR 引擎(理想情况下可以获得更高的 OCR 准确性)。
2.1 步骤
- 方向和脚本检测 (OSD) 的概念
- 如何使用 Tesseract 检测文本脚本(即书写系统)
- 如何使用 Tesseract 检测文本方向
- 如何使用 OpenCV 自动更正文本方向
pip install opencv-contrib-python
2.2 什么是方向和脚本检测?
Tesseract 有几种不同的模式,可以在自动检测和 OCR 文本时使用。其中一些模式对输入图像执行完整的OCR,而其他模式则输出元数据,例如文本信息,方向等(即orientation and script detection OSD模式)。
Tesseract的OSD模式的输出返回两个值:
- 文本方向:输入图像中文本的估计旋转角度(以度为单位)。
- 脚本:图像中文本的预测“书写系统”。
书写系统是一种传达信息的视觉方法,但与语音不同,书写系统还包括“存储”和“知识转移”的概念。
3. 源码
# 使用 Tesseract 检测和更正文本方向(检测到文本角度,旋转以转回去的角度,文本系统语言)
# 识别字母
# tesseract E:\mat\py-demo-22\extreme_points\images\normal.jpg E:\mat\py-demo-22\extreme_points\images\normal txt
# 识别osd
# tesseract E:\mat\py-demo-22\extreme_points\images\normal.jpg E:\mat\py-demo-22\extreme_points\images\normal_1 -l osd --psm 0
# USAGE
# python detect_orientation.py --image images/normal.jpg
# python detect_orientation.py --image images/rotated60.jpg
# python detect_orientation.py --image images/rotated180.jpg
# python detect_orientation.py --image images/rotated90.jpg
# python detect_orientation.py --image images/rotated120.jpg# 导入必要的包
# coding = utf -8
import argparse
import osimport cv2
import imutils
import pytesseract
from PIL import Image
import numpy as np
from pytesseract import Output  # PyTesseract 的输出类 (https://github.com/madmaze/pytesseract)。这个类只是指定了四种数据类型,包括将利用的DICT。# 语言文件.traindata
os.environ['TESSDATA_PREFIX'] = 'D:\\tesseract\\tessdata'  # 在PATH中配置tesseract环境变量或者此处指定# 如果未在PATH中配置tesseract环境变量,则需要手动设置tesseract可执行文件的全路径
pytesseract.pytesseract.tesseract_cmd = r'D:\\tesseract\\tesseract.exe'  # 手动设置另一个版本的pytesseract# 构建命令行参数及解析
# --image 要ocr的图像
ap = argparse.ArgumentParser()
ap.add_argument("-i", "--image", required=False, default="images/normal.jpg",help="path to input image to be OCR'd")
args = vars(ap.parse_args())# 加载输入图像,转换BGR为RGB通道使得其与tesseract兼容
# 调用Tesseract执行文本定向
image = cv2.imread(args["image"])
if image is None:raise Exception(args["image"] + (" image not exists"))
img = image.copy()# 打印pytesseract支持的所有语言
print('langs: ', pytesseract.get_languages(config=''))print(pytesseract.image_to_string(img))
# OR explicit beforehand converting
print(pytesseract.image_to_string(Image.fromarray(img)))# 简单的图像串
print(pytesseract.image_to_string(Image.open(args["image"])))
print(pytesseract.image_to_string(args["image"]))
# 法语文本图像串
print(pytesseract.image_to_string(Image.open(args["image"]),lang='fra'))  # 需要D:/Tesseract-OCR/tessdata/fra.traineddata# 获取详细的数据,包括盒,置信线和页码
print(pytesseract.image_to_data(Image.open(args["image"])))
# 获取有关方向和脚本检测信息
# print(pytesseract.image_to_osd(Image.open(args["image"])))
print('image_to_osd: ', pytesseract.image_to_osd(args["image"]))
# 获取包围盒估计
# print(pytesseract.image_to_boxes(Image.open(args["image"])))
print('image_to_boxes: ', pytesseract.image_to_boxes(args["image"]))rgb = cv2.cvtColor(img, cv2.COLOR_BGR2RGB)
results = pytesseract.image_to_string(rgb)
print(results)
results = pytesseract.image_to_osd(args["image"], output_type=Output.DICT, config="--dpi 70")# 展示定向信息
# 当前方向
# 旋转图像以校正其方向的度数
# 检测到的脚本类型,如拉丁语或阿拉伯语
print("[INFO] detected orientation: {}".format(results["orientation"]))
print("[INFO] rotate by {} degrees to correct".format(results["rotate"]))
print("[INFO] detected script: {}".format(results["script"]))def rotate_bound(image, angle):# grab the dimensions of the image and then determine the# center(h, w) = image.shape[:2](cX, cY) = (w / 2, h / 2)# grab the rotation matrix (applying the negative of the# angle to rotate clockwise), then grab the sine and cosine# (i.e., the rotation components of the matrix)M = cv2.getRotationMatrix2D((cX, cY), -angle, 1.0)cos = np.abs(M[0, 0])sin = np.abs(M[0, 1])# compute the new bounding dimensions of the imagenW = int((h * sin) + (w * cos))nH = int((h * cos) + (w * sin))# adjust the rotation matrix to take into account translationM[0, 2] += (nW / 2) - cXM[1, 2] += (nH / 2) - cY# perform the actual rotation and return the imagereturn cv2.warpAffine(image, M, (nW, nH), borderValue=(255, 255, 255))def getImg(img, angel,ls):print(angel+ls)rotated = rotate_bound(img, angle=angel+ls)return imutils.resize(rotated, width=300)# 旋转图像以校正方向
# 使用OpenCV的通用cv2.rotate方法,部分图像可能会丢失
# imutils.rotate_bound 不丢失保留边界的旋转图像
rotated = rotate_bound(img, angle=results["rotate"])# 展示原始图像和校正后的图像
cv2.imshow("Original", imutils.resize(img, width=300))
cv2.imshow("Output", imutils.resize(rotated,width=300))for i in range(0,361,30):cv2.imshow("Output"+str(results["rotate"]+i), getImg(img,results["rotate"],i))
cv2.waitKey(0)
参考
- https://pyimagesearch.com/2022/01/31/correcting-text-orientation-with-tesseract-and-python/
- https://digi.bib.uni-mannheim.de/tesseract/