5. 使用PyTorch预先训练的网络执行目标检测
- PyTorch是什么?
- 使用PyTorch训练第一个神经网络
- 使用PyTorch训练第一个卷积神经网络
- 使用预训练网络进行PyTorch图像分类
- 使用预训练网络进行PyTorch目标检测(今天的博客)
这篇博客将介绍如何使用PyTorch预训练的网络执行目标检测,这些网络是开创性的、最先进的图像分类网络,包括使用ResNet的更快R-CNN、使用MobileNet的更快R-CNN和RetinaNet。
- 具有ResNet50主干的更快R-CNN(Faster R-CNN with a ResNet50 backbone 更精确,但速度较慢)
- 具有MobileNet主干的更快R-CNN(Faster R-CNN with a MobileNet v3 backbone 速度更快,但准确度稍低)
- 具有ResNet50主干的RetinaNet(RetinaNet with a ResNet50 backbone 速度和准确性之间的良好平衡)
在准确度和检测小物体方面,Faster R-CNN的表现都非常好。然而,这种准确性是有代价的——Faster R-CNN 模型往往比 Single Shot Detectors (SSD) 和 YOLO慢得多。
为了帮助加快Faster R-CNN架构,可以将计算成本高昂的ResNet主干换成更轻、更高效(但不太准确)的 MobileNet主干。这样做会提高速度。
否则,RetinaNet 是速度和准确性之间的一个很好的折衷方案。
1. 效果图
第一次运行会自动下载模型
Downloading: "https://download.pytorch.org/models/fasterrcnn_resnet50_fpn_coco-258fb6c6.pth" to C:\Users\xx/.cache\torch\hub\checkpoints\fasterrcnn_resnet50_fpn_coco-258fb6c6.pth
Downloading: "https://download.pytorch.org/models/fasterrcnn_mobilenet_v3_large_320_fpn-907ea3f9.pth" to C:\Users\xx/.cache\torch\hub\checkpoints\fasterrcnn_mobilenet_v3_large_320_fpn-907ea3f9.pth
Downloading: "https://download.pytorch.org/models/retinanet_resnet50_fpn_coco-eeacb38b.pth" to C:\Users\xx/.cache\torch\hub\checkpoints\retinanet_resnet50_fpn_coco-eeacb38b.pth
frcnn-resnet 效果图如下
使用的对象检测器是一个速度更快的R-CNN,带有ResNet50主干。由于网络的设计方式,速度更快的R-CNN往往非常擅长检测图像中的小物体——这一点可以从以下事实中得到证明:不仅在输入图像中检测到了所有的风筝,而且还检测到了其中的人,椅子(人眼几乎看不到),它真实地展示了R-CNN模型在检测小对象方面有多快。
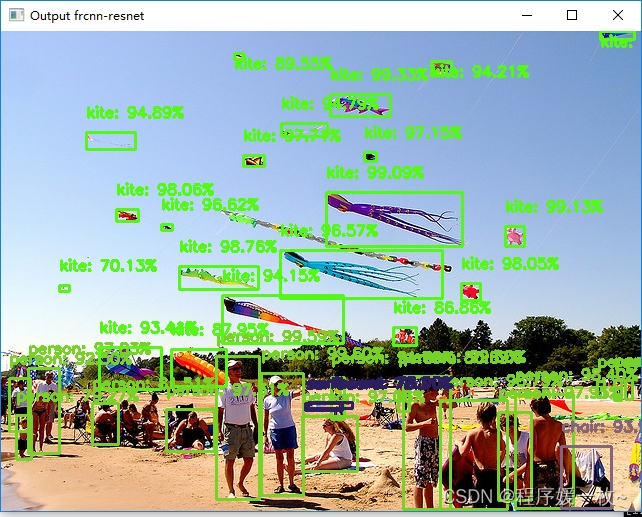
更快的R-CNN和PyTorch可以一起用于检测复杂场景中的小对象。降低默认置信度将允许检测更多对象,但可能会误报。
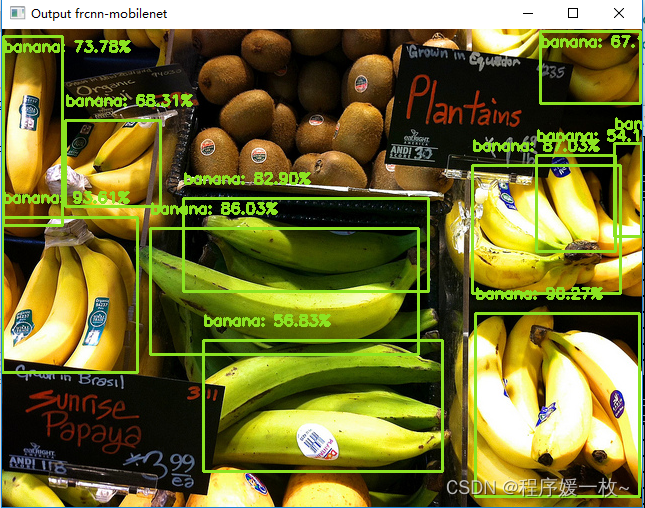
frcnn-mobilenet 效果图如下
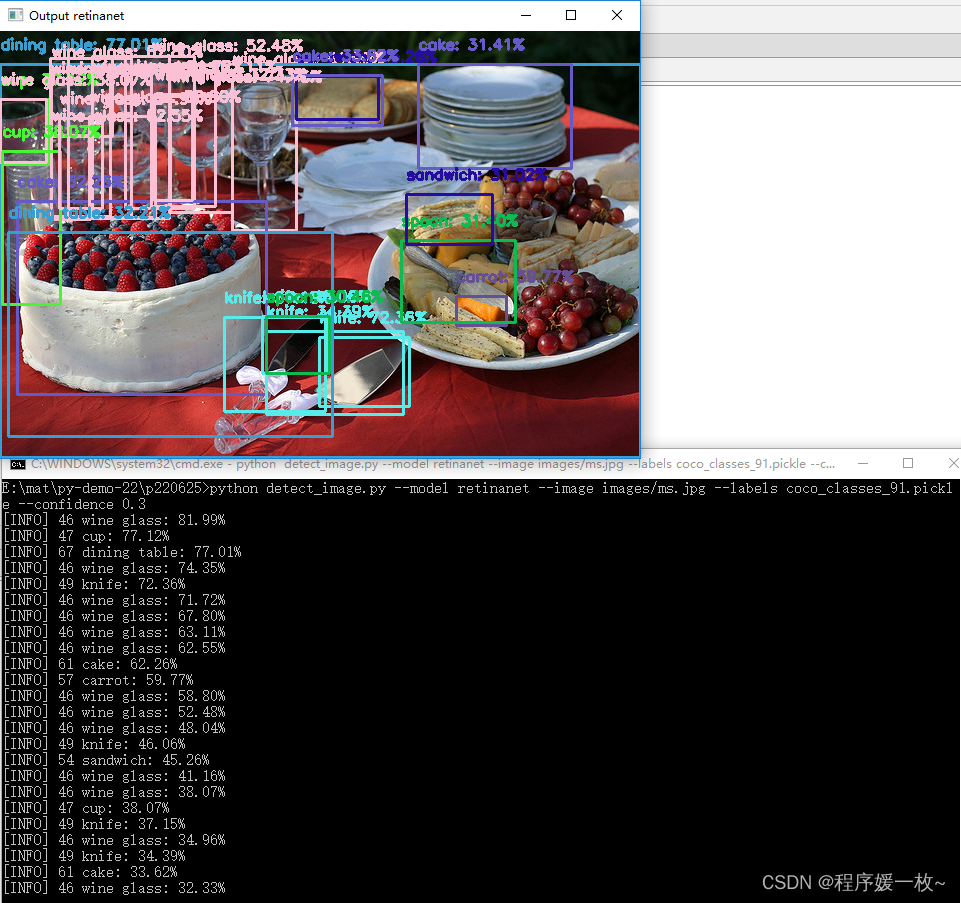
retinanet 效果图如下
可以看到蛋糕、酒杯、桌子、刀、胡萝卜、杯子都被成功检测到。
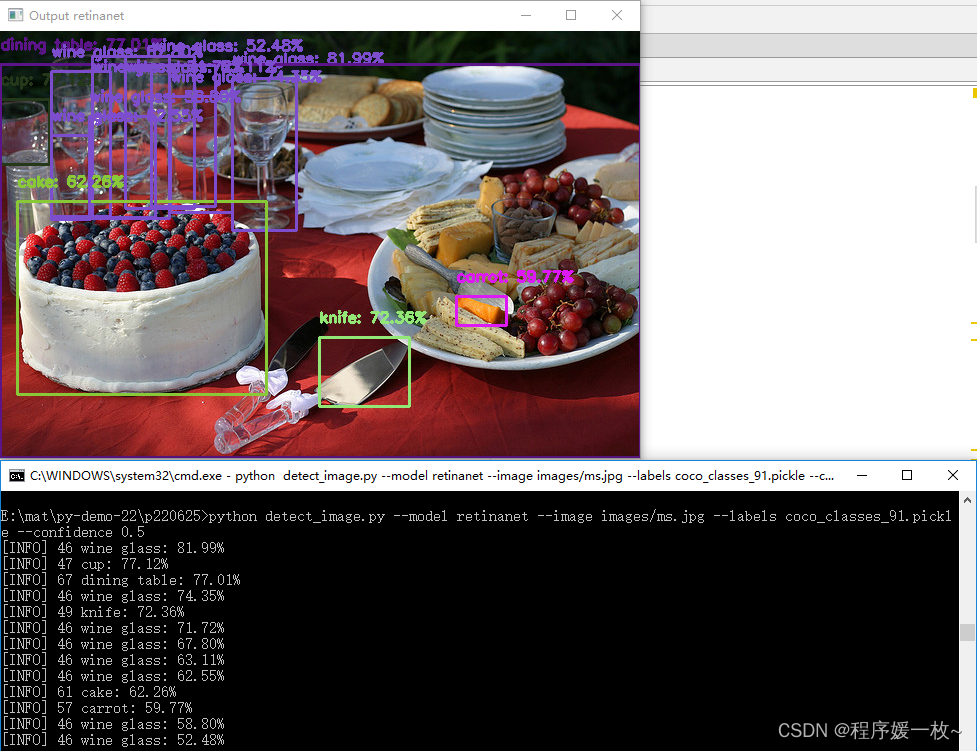
调低置信度会有更多的对象被检测出来,但也可能误报。
实时检测效果图如下
使用带有MobileNet v3的Faster R-CNN 模型(速度最佳),实现了≈5 FPS/秒。还没有达到大于20FPS的真正实时速度,但是有了更快的GPU和更多的优化可以轻松达到目标。

2. 原理
2.1 什么是经过预训练的对象检测网络,包括PyTorch库中构建的对象检测网络
就像ImageNet挑战往往是图像分类的事实标准一样,COCO数据集(上下文中的常见对象)往往是对象检测基准的标准。
该数据集包含90多类日常世界中常见的对象。计算机视觉和深度学习研究人员在COCO数据集上开发、训练和评估最先进的目标检测网络。
大多数研究人员还将预先训练好的权重发布到模型中,以便计算机视觉从业者可以轻松地将对象检测纳入自己的项目中。
本教程将演示如何使用PyTorch使用以下最先进的分类网络执行对象检测:
- 具有ResNet50主干的更快R-CNN
- 具有MobileNet主干的更快R-CNN
- 具有ResNet50主干的RetinaNet
2.2 环境部署
pip install torch torchvision
pip install opencv-contrib-python
下载coco数据集可以通过fiftyone或者github
- https://voxel51.com/docs/fiftyone/tutorials/open_images.html
- https://github.com/seminar2012/fiftyone
- https://github.com/seminar2012/cocodataset.github.io
pip install fiftyone
pip install tensorflow torch torchvision umap-learn # 使用keras及torch
pip install ipywidgets>=7.5 # jupter notebook交互图
3. 源码
3.1 照片目标检测
# USAGE
# python detect_image.py --model frcnn-resnet --image images/man.jpg --labels coco_classes_91.pickle
# python detect_image.py --model frcnn-resnet --image images/fruit.jpg --labels coco_classes_91.pickle --confidence 0.7# coco_classes.pickle 包含PyTorch预训练对象检测网络所训练的类标签的名称。
# detect_image.py:在静态图像中使用PyTorch执行对象检测
# detect_realtime.py:将PyTorch对象检测应用于实时视频流
# image/: 示例测试图片# 导入必要的包
import argparse
import pickleimport cv2
import numpy as np
import torch
from torchvision.models import detection # torchvision.models包含目标检测的预训练模型# 解析命令行参数
# --image 要执行目标检测的图像路径
# --model 要使用的PyTorch目标检测模型名称(Faster R-CNN + ResNet, Faster R-CNN + MobileNet, or RetinaNet + ResNet)
# --labels: COCO标签文件路径,包含可读性强的类标签containing human readable class labels
# --confidence: 过滤弱检测的置信度阈值
ap = argparse.ArgumentParser()
ap.add_argument("-i", "--image", type=str, required=False, default='images/banner_eccv18.jpg',help="path to the input image")
ap.add_argument("-m", "--model", type=str, default="frcnn-resnet",choices=["frcnn-resnet", "frcnn-mobilenet", "retinanet"],help="name of the object detection model")
ap.add_argument("-l", "--labels", type=str, default="coco_classes_91.pickle",help="path to file containing list of categories in COCO dataset")
ap.add_argument("-c", "--confidence", type=float, default=0.5,help="minimum probability to filter weak detections")
args = vars(ap.parse_args())# 设置使用cpu/gpu
DEVICE = torch.device("cuda" if torch.cuda.is_available() else "cpu")# 加载COCO数据集标签,生成对应的边界框颜色列表(为每个标签生成随机颜色)
CLASSES = pickle.loads(open(args["labels"], "rb").read())
COLORS = np.random.uniform(0, 255, size=(len(CLASSES), 3))# 初始化一个字典包括模型名及对应的PyTorch模型调用函数
# - 带有ResNet50主干网的快速R-CNN(Faster R-CNN with a ResNet50 backbone 更精确,但速度较慢)
# - 带有MobileNet v3主干网的快速R-CNN(Faster R-CNN with a MobileNet v3 backbone 速度更快,但准确度稍低)
# - 带有ResNet50主干网的RetinaNet(RetinaNet with a ResNet50 backbone 速度和准确性之间的良好平衡)
MODELS = {"frcnn-resnet": detection.fasterrcnn_resnet50_fpn,"frcnn-mobilenet": detection.fasterrcnn_mobilenet_v3_large_320_fpn,"retinanet": detection.retinanet_resnet50_fpn
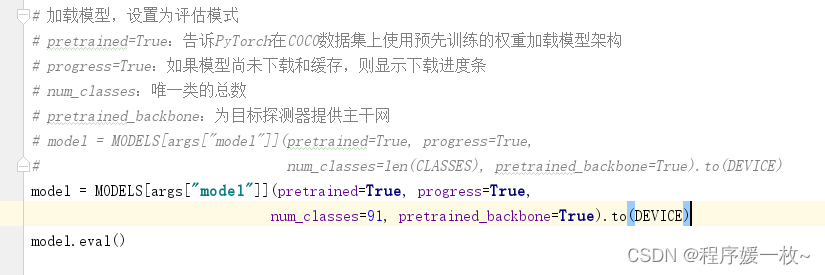
}# 加载模型,设置为评估模式
# pretrained=True:告诉PyTorch在COCO数据集上使用预先训练的权重加载模型架构
# progress=True:如果模型尚未下载和缓存,则显示下载进度条
# num_classes:唯一类的总数
# pretrained_backbone:为目标探测器提供主干网
# model = MODELS[args["model"]](pretrained=True, progress=True,
# num_classes=len(CLASSES), pretrained_backbone=True).to(DEVICE)
model = MODELS[args["model"]](pretrained=True, progress=True,num_classes=91, pretrained_backbone=True).to(DEVICE)
model.eval()# 从磁盘加载图像
image = cv2.imread(args["image"])
orig = image.copy()# 将颜色通道顺序从BGR转换为RGB(因为PyTorch模型是在RGB顺序图像上训练的)
# 将颜色通道顺序从“通道最后”(OpenCV和Keras/TensorFlow默认值)切换到“通道第一”(PyTorch默认值)
image = cv2.cvtColor(image, cv2.COLOR_BGR2RGB)
image = image.transpose((2, 0, 1))# 添加维度,缩放像素值为[0,1]范围
# 将图像从NumPy数组转换为具有浮点数据类型的张量
image = np.expand_dims(image, axis=0)
image = image / 255.0
image = torch.FloatTensor(image)# 传递图像到设备,并进行预测
image = image.to(DEVICE)
detections = model(image)[0]# 遍历检测结果
for i in range(0, len(detections["boxes"])):# 获取与检测相关的置信度(即概率)confidence = detections["scores"][i]# 过滤弱检测if confidence > args["confidence"]:# 提取类标签的下标,计算对象的边界框坐标idx = int(detections["labels"][i])box = detections["boxes"][i].detach().cpu().numpy()# 获取边界框坐标并将其转换为整数(startX, startY, endX, endY) = box.astype("int")# 展示类标签到终端label = "{} {}: {:.2f}%".format(str(idx), CLASSES[idx], confidence * 100)print("[INFO] {}".format(label))label = "{}: {:.2f}%".format(CLASSES[idx], confidence * 100)# 绘制边界框和label在图像上cv2.rectangle(orig, (startX, startY), (endX, endY),COLORS[idx], 2)y = startY - 15 if startY - 15 > 15 else startY + 15cv2.putText(orig, label, (startX, y),cv2.FONT_HERSHEY_SIMPLEX, 0.5, COLORS[idx], 2)# 展示输出图像
cv2.imshow("Output " + str(args["model"]), orig)
cv2.waitKey(0)
3.2 实时视频流(文件/摄像头)目标检测
# coco_classes.pickle 包含PyTorch预训练对象检测网络所训练的类标签的名称。
# detect_frame.py:在静态图像中使用PyTorch执行对象检测
# detect_realtime.py:将PyTorch对象检测应用于实时视频流
# frame/: 示例测试图片# USAGE
# python detect_realtime.py --model frcnn-mobilenet --labels coco_classes_91.pickle
# python detect_realtime.py --model frcnn-mobilenet --input images/jurassic_park_trailer.mp4 --labels coco_classes_91.pickle --confidence 0.6# 导入必要的包
import argparse
import pickle
import timeimport cv2
import imutils
import numpy as np
import torch
from imutils.video import FPS  # FPS:测量对象检测管道的近似每秒帧数吞吐率
from imutils.video import VideoStream  # 访问摄像头流
from torchvision.models import detection# 构建命令行参数及解析
# --model 要使用的PyTorch目标检测模型名称(Faster R-CNN + ResNet, Faster R-CNN + MobileNet, or RetinaNet + ResNet)
# --labels: COCO标签文件路径,包含可读性强的类标签containing human readable class labels
# -i 可选的输入视频文件路径,不输入则使用网络摄像头
# -o 可选的输出视频文件路径
# --confidence: 置信度阈值,过滤弱的假阳性检测
ap = argparse.ArgumentParser()
ap.add_argument("-m", "--model", type=str, default="frcnn-resnet",choices=["frcnn-resnet", "frcnn-mobilenet", "retinanet"],help="name of the object detection model")
ap.add_argument("-l", "--labels", type=str, default="coco_classes_90.pickle",help="path to file containing list of categories in COCO dataset")
ap.add_argument("-i", "--input", type=str,help="path to optional input video file")
ap.add_argument("-o", "--output", type=str,help="path to optional output video file")
ap.add_argument("-c", "--confidence", type=float, default=0.5,help="minimum probability to filter weak detections")
args = vars(ap.parse_args())# 设置使用cpu/gpu
DEVICE = torch.device("cuda" if torch.cuda.is_available() else "cpu")# 加载COCO数据集标签,生成对应的边界框颜色列表(为每个标签生成随机颜色)
CLASSES = pickle.loads(open(args["labels"], "rb").read())
COLORS = np.random.uniform(0, 255, size=(len(CLASSES), 3))# 初始化一个字典包括模型名及对应的PyTorch模型调用函数
# - 带有ResNet50主干网的快速R-CNN(Faster R-CNN with a ResNet50 backbone 更精确,但速度较慢)
# - 带有MobileNet v3主干网的快速R-CNN(Faster R-CNN with a MobileNet v3 backbone 速度更快,但准确度稍低)
# - 带有ResNet50主干网的RetinaNet(RetinaNet with a ResNet50 backbone 速度和准确性之间的良好平衡)
MODELS = {"frcnn-resnet": detection.fasterrcnn_resnet50_fpn,"frcnn-mobilenet": detection.fasterrcnn_mobilenet_v3_large_320_fpn,"retinanet": detection.retinanet_resnet50_fpn
}# 加载模型,设置为评估模式
# pretrained=True:告诉PyTorch在COCO数据集上使用预先训练的权重加载模型架构
# progress=True:如果模型尚未下载和缓存,则显示下载进度条
# num_classes:唯一类的总数
# pretrained_backbone:为目标探测器提供主干网
model = MODELS[args["model"]](pretrained=True, progress=True,num_classes=len(CLASSES), pretrained_backbone=True).to(DEVICE)
model.eval()# 如果没有输入的视频文件路径提供,则获取网络摄像头的指针
# 初始化视频流,允许摄像头预热2s,初始化fps吞吐量
if not args.get("input", False):print("[INFO] starting video stream...")vs = VideoStream(src=0).start()time.sleep(2.0)
# 否则,获取视频文件指针
else:print("[INFO] opening video file...")vs = cv2.VideoCapture(args["input"])
fps = FPS().start()# 初始化视频文件writer
writer = None# 初始化帧的宽度和高度
W = None
H = None# 遍历视频流里的帧
while True:# 从线程化的视频流获取帧,缩放为宽度400px# 从视频流中读取一帧,调整其大小(输入帧越小,推断速度越快),然后克隆它,以便以后可以对其进行绘制# 获取下一帧,并判断是从摄像头或者文件捕获到的帧frame = vs.read()frame = frame[1] if args.get("input", False) else frame# 如果在文件流未获取到视频帧,则表明到了文件末尾,终止循环if args["input"] is not None and frame is None:breakframe = imutils.resize(frame, width=400)orig = frame.copy()# 将颜色通道顺序从BGR转换为RGB(因为PyTorch模型是在RGB顺序图像上训练的)# 将颜色通道顺序从“通道最后”(OpenCV和Keras/TensorFlow默认值)切换到“通道第一”(PyTorch默认值)frame = cv2.cvtColor(frame, cv2.COLOR_BGR2RGB)frame = frame.transpose((2, 0, 1))# 添加维度,缩放像素值为[0,1]范围# 将图像从NumPy数组转换为具有浮点数据类型的张量frame = np.expand_dims(frame, axis=0)frame = frame / 255.0frame = torch.FloatTensor(frame)# 传递图像到设备,并进行预测frame = frame.to(DEVICE)detections = model(frame)[0]# 遍历检测结果for i in range(0, len(detections["boxes"])):# 获取与检测相关的置信度(即概率)confidence = detections["scores"][i]# 过滤弱检测if confidence > args["confidence"]:# 提取类标签的下标,计算对象的边界框坐标idx = int(detections["labels"][i])box = detections["boxes"][i].detach().cpu().numpy()# 获取边界框坐标并将其转换为整数(startX, startY, endX, endY) = box.astype("int")# 展示类标签到终端label = "{}: {:.2f}%".format(CLASSES[idx], confidence * 100)print("[INFO] {}".format(label))# 绘制边界框和label在图像上cv2.rectangle(orig, (startX, startY), (endX, endY),COLORS[idx], 2)y = startY - 15 if startY - 15 > 15 else startY + 15cv2.putText(orig, label, (startX, y),cv2.FONT_HERSHEY_SIMPLEX, 0.5, COLORS[idx], 2)# 如果帧的宽度和高度为None,则定义WHif W is None or H is None:(H, W) = orig.shape[:2]# 如果需要写入结果视频流到磁盘,则初始化writerif args["output"] is not None and writer is None:fourcc = cv2.VideoWriter_fourcc(*"MJPG")writer = cv2.VideoWriter(args["output"], fourcc, 30,(W, H), True)# 检查是否绘制结果到文件if writer is not None:writer.write(orig)# 展示输出帧cv2.imshow("Frame", orig)key = cv2.waitKey(1) & 0xFF# 按下‘q’键,退出循环if key == ord("q"):break# 更新fps计数器fps.update()# 停止FPS计时器并显示(1)脚本运行时间和(2)大约每秒帧数吞吐量信息。
fps.stop()
print("[INFO] elapsed time: {:.2f}".format(fps.elapsed()))
print("[INFO] approx. FPS: {:.2f}".format(fps.fps()))# 检查是否需要释放视频writer指针
if writer is not None:writer.release()# 如果不使用视频文件,停止线程化的视频流对象
if not args.get("input", False):vs.stop()
# 否则释放视频流指针
else:vs.release()# 关闭所有打开的窗口
cv2.destroyAllWindows()
参考
- https://pyimagesearch.com/2021/08/02/pytorch-object-detection-with-pre-trained-networks/
- https://cocodataset.org/#download
- RuntimeError: Error(s) in loading state_dict for FasterRCNN: size mismatch for roi_heads.box_predictor.cls_score.weight: copying a param with shape torch.Size([91, 1024]) from checkpoint, the shape in current model is torch.Size([80, 1024]). 报错解决
- pickle.load,pickle.dump构建Coco数据集labels的pickle文件