1、normalize函数
void cv::normalize(InputArry src,InputOutputArray dst,double alpha=1,double beta=0,int norm_type=NORM_L2,int dtype=-1,InputArray mark=noArry())
(1)函数的作用
将输入图像src归一化。
注意:alpha、beta作为规范范围的上下限,代表的是输入图像数据类型的显示范围。
ex:对于32F位图像,因为显示范围是0—1,所以alpha、beta为0、1,才能显示与保存。
normalize(img,img, 0, 1, NORM_MINMAX);
imshow(img);
对于16U位图像,因为显示范围是0—65535,所以alpha、beta为0、65535,才能显示与保存。
normalize(img,img, 0, 65535, NORM_MINMAX);
normalize(img,img,-32768, 32767, NORM_MINMAX);//CV_16S的归一化
imshow(img);
(2)参数说明
src 输入数组;
dst 输出数组,数组的大小和原数组一致;
alpha 1,用来规范值,2.规范范围,并且是下限;
beta 只用来规范范围并且是上限;
norm_type 归一化选择的数学公式类型;
dtype 当为负,输出在大小深度通道数都等于输入,当为正,输出只在深度与输如不同,不同的地方游dtype决定;
mark 掩码。选择感兴趣区域,选定后只能对该区域进行操作。
2、mat.type()函数
opencv中Mat存在各种类型,其中mat有一个type()的函数可以返回该Mat的类型。类型表示了矩阵中元素的类型以及矩阵的通道个数,它是一系列的预定义的常量。具体的有以下值:
通道数我们可以发现,C4=C3+8、C3=C2+8、C2=C1+8
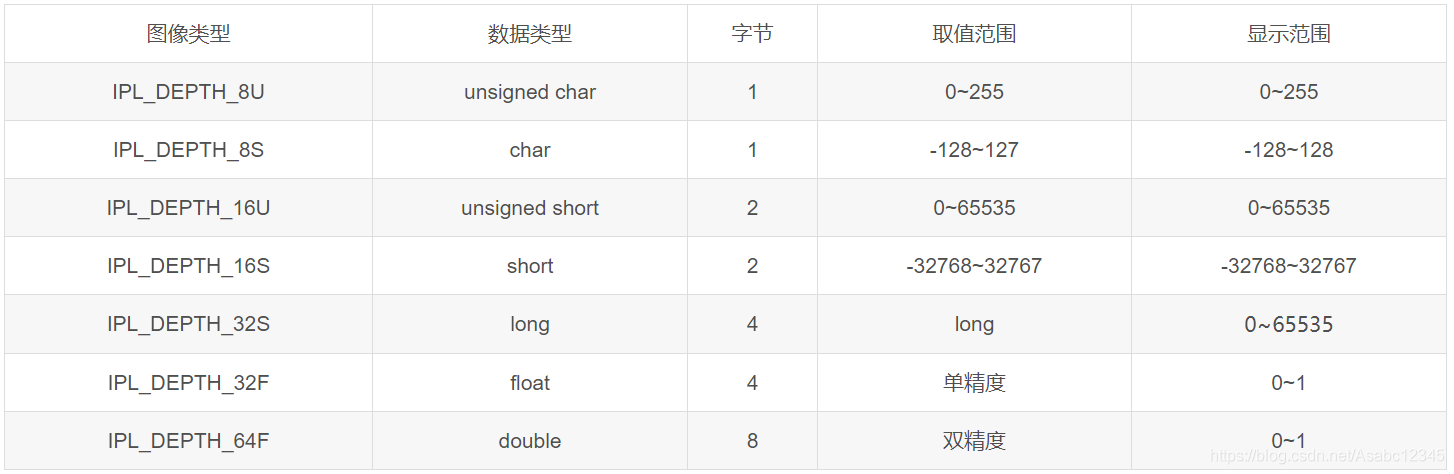
Unsigned 8bits uchar 0~255
Mat: CV_8UC1, CV_8UC2, CV_8UC3, CV_8UC4Signed 8bits char -128~127
Mat: CV_8SC1,CV_8SC2,CV_8SC3,CV_8SC4Unsigned 16bits ushort 0~65535
Mat: CV_16UC1,CV_16UC2,CV_16UC3,CV_16UC4Signed 16bits short -32768~32767
Mat: CV_16SC1,CV_16SC2,CV_16SC3,CV_16SC4Signed 32bits int -2147483648~2147483647
Mat: CV_32SC1,CV_32SC2,CV_32SC3,CV_32SC4Float 32bits float -1.18*10-38~3.40*10-38
Mat: CV_32FC1,CV_32FC2,CV_32FC3,CV_32FC4Double 64bits double
Mat: CV_64FC1,CV_64FC2,CV_64FC3,CV_64FC4
一、显示数据类型
#include <iostream>
#include <sstream>
#include <time.h>
#include <stdio.h>
#include <opencv2/opencv.hpp>
#include <opencv2/core.hpp>
#include <opencv2/core/utility.hpp>
#include <opencv2/imgproc.hpp>
#include <opencv2/calib3d.hpp>
#include <opencv2/imgcodecs.hpp>
#include <opencv2/videoio.hpp>
#include <opencv2/highgui.hpp>#include <pcl/visualization/cloud_viewer.h>
#include <pcl/io/io.h>
#include <pcl/io/pcd_io.h>  using namespace cv;
using namespace std;
using namespace pcl;int main()
{Mat img = imread("12.bmp");cout << img.type() << endl;imshow("11", img);waitKey(0);system("pause");return 0;
}

因为type()=16=0:所以是CV_8U类型,可以使用imshow直接显示。
二、imshow和imwrite函数
imshow
opencv的imshow函数都只能对像素值处于0-255范围内的图像进行显示。也就是说,无法使用OpenCV提供的接口函数显示诸如CV_16S等非8位数据格式的视差图/深度图,只能转换成CV_8U格式进行操作。
其实,人眼对灰度级的敏感度比较低、根本无法分辨256级灰度值。而对视差图/深度图进行显示,也只是为了比较直观的验证视差图/深度图的准确性(如颜色随距离逐层变化),所以说完全没必要对216 =65536级灰度进行显示,转换成CV_8U格式就能完全满足需求,这也许就是为什么OpenCV没有提供这样接口的原因之一吧。imwrite
而存储的话,imwrite函数在关于保存为不同深度格式时候的图像类型支持说明如下:8位的图像(CV_8U),支持png/jpg/bmp/webp等各种常见图像格式
16位的图像(CV_16U),支持png/jpeg2000/TIFF格式
32位的图像(CV_32F),支持PFM/TIFF/OpenEXR/TIFF/HDR
在要保存为指定格式之前,可以通过convertTo或者cvtCOLOR进行图像类型或者通道转换之后,再调用imwrite进行保存。OpenCV默认的图像格式为CV_8UC3,此时图像为3通道、8位RGB图像,每个通道所能表达的灰度阶为2^8=256。而视差图常为CV_16S或CV_32S等,如果直接使用cv::imwrite()保存视差图或深度图,则图像将被转成CV_8U格式,而像素值大于255将会被转成255。
OpenCV提供的接口函数:cv::imwrite()、cv::imshow()都只能对像素值处于0-255范围内的图像进行存储和显示,其他范围内的图像,则会被转成0-255范围进行存储、显示。也就是说,无法使用OpenCV提供的接口函数存储和显示诸如CV_16S格式的视差图/深度图,只能转换成CV_8U格式进行操作。
三、转换为CV_16U/CV_16S,以及如何显示16位图像
(1)转换
转换后的类型=18=2:所以是CV_16U;因为imshow只能显示CV_8U,所以显示为全黑。
#include <iostream>
#include <sstream>
#include <time.h>
#include <stdio.h>
#include <opencv2/opencv.hpp>
#include <opencv2/core.hpp>
#include <opencv2/core/utility.hpp>
#include <opencv2/imgproc.hpp>
#include <opencv2/calib3d.hpp>
#include <opencv2/imgcodecs.hpp>
#include <opencv2/videoio.hpp>
#include <opencv2/highgui.hpp>#include <pcl/visualization/cloud_viewer.h>
#include <pcl/io/io.h>
#include <pcl/io/pcd_io.h>  using namespace cv;
using namespace std;
using namespace pcl;int main()
{Mat img = imread("12.bmp");cout << "before="<<img.type() << endl;img.convertTo(img, CV_16U);cout << "after=" << img.type() << endl;imshow("11", img);waitKey(0);system("pause");return 0;
}

(2)显示
方法一:直接将16位转成8位,也就是低于255的不变,高于的全部转位255,数据的实际信息会丢失.如果设置为很大的值,数据丢失的会更大;
方法二:进行归一化,数据类型依旧是CV_16U;
#include <iostream>
#include <sstream>
#include <time.h>
#include <stdio.h>
#include <opencv2/opencv.hpp>
#include <opencv2/core.hpp>
#include <opencv2/core/utility.hpp>
#include <opencv2/imgproc.hpp>
#include <opencv2/calib3d.hpp>
#include <opencv2/imgcodecs.hpp>
#include <opencv2/videoio.hpp>
#include <opencv2/highgui.hpp>#include <pcl/visualization/cloud_viewer.h>
#include <pcl/io/io.h>
#include <pcl/io/pcd_io.h>  using namespace cv;
using namespace std;
using namespace pcl;int main()
{Mat img = imread("12.bmp");cout << "before="<<img.type() << endl;img.convertTo(img, CV_16U);cout << "after=" << img.type() << endl;方法一//img.convertTo(img, CV_8U);//cout << "after=" << img.type() << endl;//方法二//进行了0~255的归一化以后,可以显示normalize(img,img, 0, 256 * 256, NORM_MINMAX);//normalize(img,img,-32768, 32767, NORM_MINMAX);//CV_16S的归一化cout << "after=" << img.type() << endl;imshow("11", img);waitKey(0);system("pause");return 0;
}
(3)保存
方法一://16位数据后,直接保存,不会引起数据的丢失,但是保存的是原始的数据
imwrite( "1.png", dst);
方法二:归一化以后再保存
normalize(dst, dst, 0, 256* 256, NORM_MINMAX);imwrite( "1.png", dst);//进行了0~255的归一化以后,可以显示
四、转换为CV_32F,以及如何显示32位图像
(1)转换
转换后的类型=21=5:所以是CV_32F;因为imshow只能显示CV_8U,所以显示为全白。
#include <iostream>
#include <sstream>
#include <time.h>
#include <stdio.h>
#include <opencv2/opencv.hpp>
#include <opencv2/core.hpp>
#include <opencv2/core/utility.hpp>
#include <opencv2/imgproc.hpp>
#include <opencv2/calib3d.hpp>
#include <opencv2/imgcodecs.hpp>
#include <opencv2/videoio.hpp>
#include <opencv2/highgui.hpp>#include <pcl/visualization/cloud_viewer.h>
#include <pcl/io/io.h>
#include <pcl/io/pcd_io.h>  using namespace cv;
using namespace std;
using namespace pcl;int main()
{Mat img = imread("12.bmp");cout << "before="<<img.type() << endl;img.convertTo(img, CV_32F);cout << "after=" << img.type() << endl;imshow("11", img);waitKey(0);system("pause");return 0;
}

(2)显示
方法一:直接将32位转成8位,也就是低于255的不变,高于的全部转为255,数据的实际信息会丢失.如果设置为很大的值,数据丢失的会更大;
方法二:进行归一化,数据类型依旧是CV_16U;
#include <iostream>
#include <sstream>
#include <time.h>
#include <stdio.h>
#include <opencv2/opencv.hpp>
#include <opencv2/core.hpp>
#include <opencv2/core/utility.hpp>
#include <opencv2/imgproc.hpp>
#include <opencv2/calib3d.hpp>
#include <opencv2/imgcodecs.hpp>
#include <opencv2/videoio.hpp>
#include <opencv2/highgui.hpp>#include <pcl/visualization/cloud_viewer.h>
#include <pcl/io/io.h>
#include <pcl/io/pcd_io.h>  using namespace cv;
using namespace std;
using namespace pcl;int main()
{Mat img = imread("12.bmp");cout << "before="<<img.type() << endl;img.convertTo(img, CV_32F);cout << "after=" << img.type() << endl;//方法一/*img.convertTo(img, CV_8U);cout << "after=" << img.type() << endl;*///方法二//进行了0~1的归一化以后,可以显示normalize(img,img, 0, 1, NORM_MINMAX);cout << "after=" << img.type() << endl;imshow("11", img);waitKey(0);system("pause");return 0;
}

(3)保存
归一化以后再保存
normalize(dst, dst, 0, 1, NORM_MINMAX);imwrite( "1.png", dst);//进行了0~1的归一化以后,可以显示